Sunday 17 March 2013

Pork Dumplings with Hand Made Wrappers

Making dumplings for the first time can prove a little tricky but with tips and a bit of practice you'll be making your own in no time.  Pop them into the freezer and you have a delicious snack that you can prepare quickly.  My gorgeous girls love them and they are great for tots.... mmmmmmmmmmmmm.

If you  have a cleaver, go to your local butcher and ask for pork belly and try mincing your own meat, this way you will end up with a spongey, moist filling that is flavoursome and juicy instead of dry.  
Chinese cooks use two cleavers to mince their meat but I only feel comfortable using one thanks very much!
Here we are aiming for half fat and half lean pork so that the fat renders down whilst cooking and keeps the filling moist.
Slice the ginger then fan it out and shred it finely.
In a fan type motion with your knife or cleaver, dice the ginger finely in a similar way that you'd finely chop herbs.
Mix hot water into the flour first before adding cold so that the water cooks the flour and it ends up looking like this.  This is an important step as the hot water helps to make the dough elastic and it is easier to fill your dumpling wrappers.
Keep kneading the dough just like bread so that it ends up looking like the dough below.
Here, the gluten has started to relax and the dough is still soft and a little sticky.  Try not to spread too much flour on your working surface or you will lose the stickiness in the dough.  If you have to use a little flour only use cornflour otherwise, plain flour and the like will be absorbed into the dough and make it unmanageable.
Cut the dough into portions and cover them in plastic wrap ready for use.
Roll the portion of dough into a long rope and cut with a plastic scraper, similar to gnocchi.  Notice that there isn't too much flour on the work surface.
 Press the piece of dough down with the palm of your hand, cut surface facing up, so that a circle is formed then roll the wrapper as above.  I have a dim sum rolling pin but you can go to your local hardware store and have a small bit of wood cut to suit.  
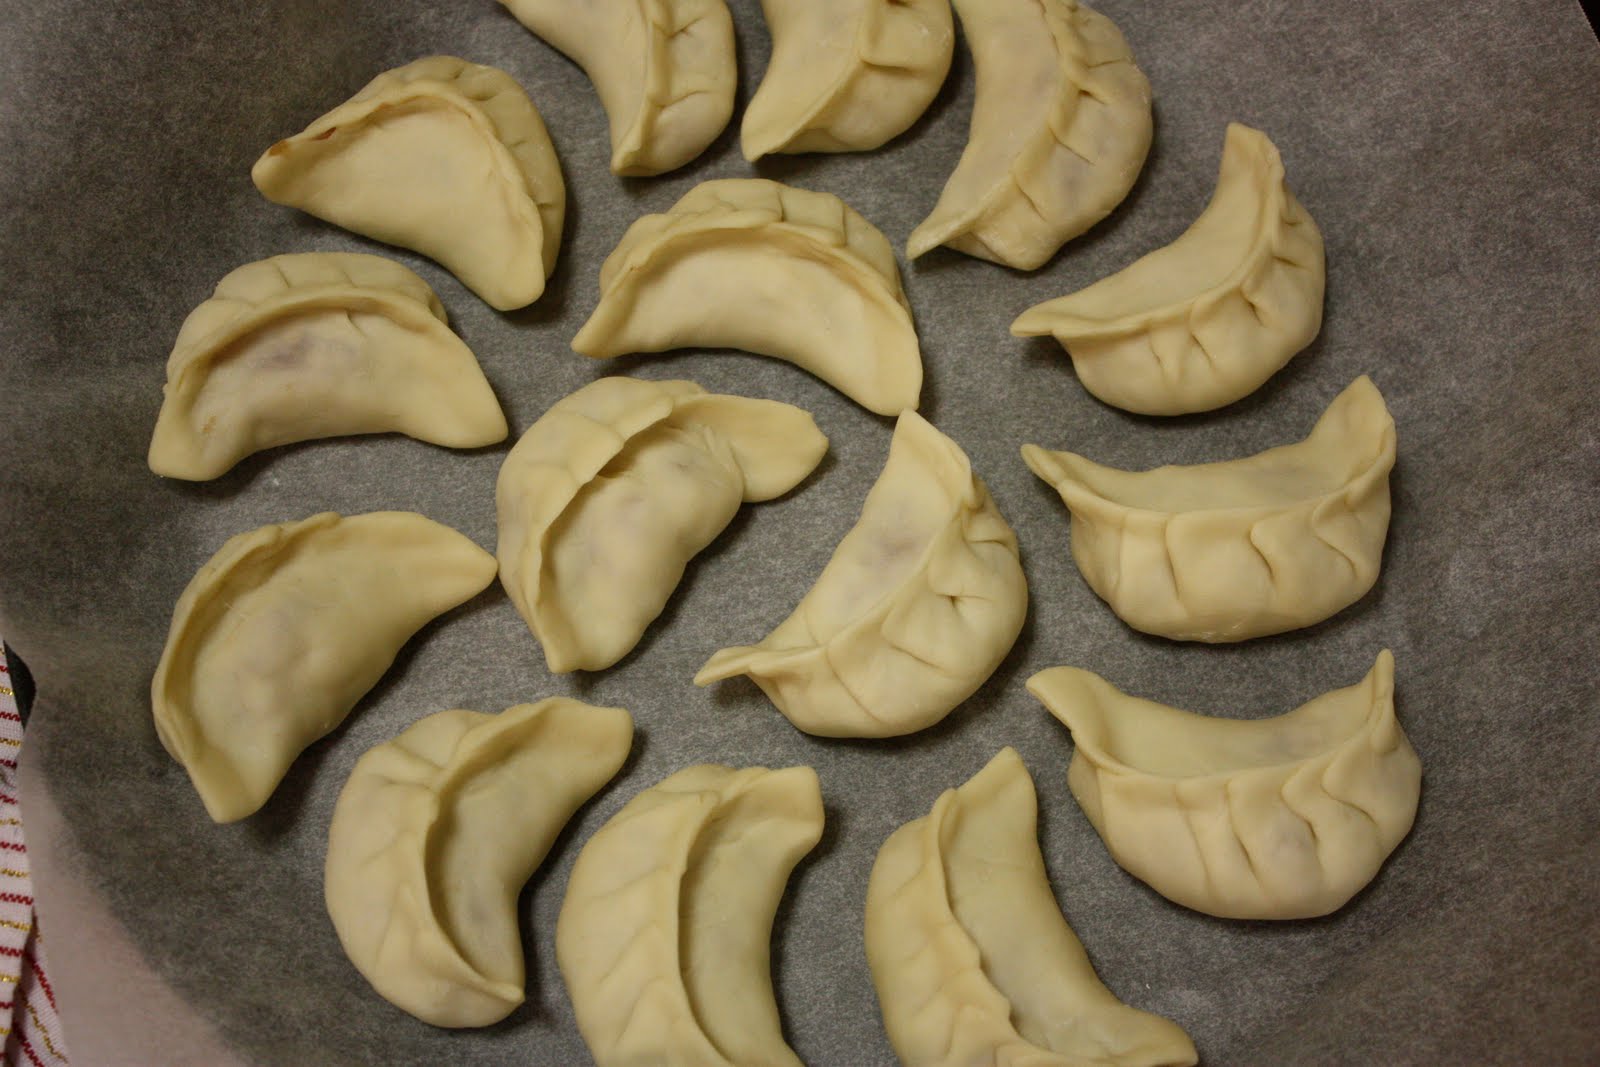
When you fill the dumpling it is important to leave a a rim so that you can fold and pleat the wrapper.  Oops, in the above photo I dredged the dumplings with too much cornflour which made it difficult to pleat and seal the wrapper - not good.
To form the dumpling, fill the wrapper, fold it in half then pinch the right hand corner.  Start pleating the front side of the wrapper whilst pinching against the back of the wrapper and there you have it.  Notice that I haven't dredged the bench or dumpling with much cornflour and the result is a lot better.

Pork Filling
300g pork mince 
2 tablespoon sesame oil
1 tsp sugar
1 tsp salt
1 tsp shao xing wine
1 tsp light soy sauce
1/2 tsp white pepper
3 large slices ginger chopped finely (I don't normally measure the ginger and put lots in for health benefits)
1 1/2 tsp cornflour

Marinate the pork with the sesame oil, sugar, salt, shao hsing wine, light soy sauce and pepper for 20 minutes then add the finely chopped ginger and cornflour. Mix well to combine. Set aside.

Dumpling Wrapper
300g plain flour
1 tsp sesame oil
2/3 cup hot water
1/3 cup cold water
cornflour for dredging (see photo's and tips above)

Sift flour into a bowl then add the sesame oil and hot water.  Mix together with a pair of chopsticks.  Add the cold water a little at a time until the dough forms then knead until smooth.  Cover with cling wrap and allow to rest for 10 minutes.
Cut the dough into portions.  Roll each dough portion into a rope and cut with a plastic scraper similar to gnocchi. Use cornflour sparingly to dredge the dumplings (if required) to prevent them from sticking to the bench top.
Press the piece of dough down with the palm of your hand, cut surface facing up, so that a circle is formed then roll the wrapper - see photo's above.  

Fill the wrapper with the pork mixture and pleat the dumpling.  Place the finished dumpling on a tray lined with parchment paper.  Cover with a damp cloth so that they don't dry out.  At this stage you can cook them in a pot of boiling water for about 5 minutes or you can add them to a pan with oil and water to make pot stickers.  Alternatively, you can freeze them.  Serve with Chinkiang vinegar with slivers of ginger - enjoy.

If you have some left over pork filling, roll it into little balls and freeze them.  For a quick snack boil up some chicken stock with some finely diced coriander root and add the pork balls.  When the pork is nearly cooked add some choy sum and cook for another 1-2 minutes.  Serve with coriander leaves,  some finely sliced spring onion and a drizzle of sesame oil.

Rice Noodles with Beef & Soy Sauce

These noodles were my absolute favourite in Hong Kong and I think I make a pretty mean version of them.  A chef located at Causeway Bay has a reputation for making the best version of this dish, he uses pork fat in his recipe and so do I...

Ingredients:

2 small rib eye beef steaks (sliced finely)
3 cloves of garlic (chopped finely)
2 tblspn fresh ginger (chopped finely)
1 bunch of garlic chives (cut into 1 inch lengths)
pork fat (walnut size)
1 packet of fresh rice noodles (sliced thickly)
1 cup of oil (to blanch the beef)
1 tbsp oil extra

Marinade:
1 tsp bicarbonate soda
2 tsp water
2 tsp shao xing wine

Sauce:
3 tbsp light soy sauce
1 tbsp dark soy sauce
1 1/2 tbsp sugar
1/2 tsp chicken powder

1.  Marinate the beef in the marinade for 15 minutes.  Make sure that you dissolve the bicarb soda well in the water before adding it to the beef and mix thoroughly.  After 15 minutes pour the beef into a sieve to remove excess moisture then using one cup of oil, blanch the beef in the wok (on high heat) until it changes colour - remove.  Pour the oil through a strainer and either dispose or store for later use. Rinse the hot wok under running tap water and clean with a nylon brush then put it back on the wok burner for later use.

2.  Pour a few drops of dark soy sauce onto the fresh rice noodles (in a bowl) and mix thoroughly so that they become a lovely brown colour.

3.   Heat the wok on high until it smokes.  Add 1 tbsp cold oil (drizzled around the middle of the wok so that it runs down to the bottom) then add the chopped ginger and garlic.  Stir-fry a few seconds then add the strained beef back to the wok, add the garlic chives and stir-fry continuously until the garlic chives start to wilt.  At this stage, add the pork fat then the rice noodles.  Stir-fry until the noodles become soft and separate.

4.  Add the sauce and stir-fry until the noodles and beef are well coated.

Note: For the pork fat I went to my local butcher and asked for the fat that surrounds the kidneys.  This fat renders down to a liquid and imparts a smoky flavour to the dish.  Garlic chives and the fresh rice noodles are available from your local Asian grocery store. Below is a picture of the packet of fresh noodles that I used.


Caramelised Pork & Green Paw Paw Salad


Today, I got up early and went to the local farmer's market and came home with an array of lovely fresh ingredients and decided to make my version of caramelised pork with green paw paw salad.
Chilli, garlic, lemongrass, fish sauce & palm sugar
Minced pork with the palm sugar, lemongrass & fish sauce
You need to cook the pork until all moisture dissipates and the pork turns a lovely caramel colour

Caramelised Pork
1/4 cup Viet Huong Fish Sauce Three Crabs Brand
5 lumps Pure Palm Sugar Mom & Me Brand (each lump is about the size of a dessert spoon) smashed in a mortar & pestle
1 lemongrass stalk (white part only finely chopped)
500g pork mince
1 tablespoon peanut oil

Pour the oil into a non stick pan and fry the mince for a couple of minutes.
Add the lemongrass, fish sauce and palm sugar.
Cook until all moisture evaporates and the sugar starts to caramelise and the pork starts to brown.
Remove from heat and allow to cool.
Grating green paw paw with my very expensive grater that cost all of 3 bucks
Green Paw Paw & Organic Carrot
Basil & Mint

Green Paw Paw Salad
1 green paw paw (grated)
1 organic carrot (grated)
1/2 large yellow peach or 1 small peach (grated)
1 cup basil (use scissors to cut the basil up into smaller pieces)
1 cup mint (use scissors to cut up the mint into smaller pieces)
1/2 large red Spanish onion (finely chopped)
Fried Spring Onions & Crushed Peanuts for garnishing

Dressing
Juice from 3 limes
2 tablespoons fish sauce
1 tablespoon garlic (finely minced)
1 long red chilli (finely minced)
1 lump Pure Palm Sugar - smashed with a mortar & pestle (about the size of a dessert spoon)

Assembly
Place all Green Paw Paw Salad ingredients in a large serving bowl.
Add the caramelised pork and combine thoroughly.
Pour the dressing over the top and toss again to ensure the dressing coats all of the ingredients.
Sprinkle some fried spring onions and crushed peanuts on top and serve with some steamed jasmine rice - I use Happy brand fried onions from Malaysia.

Sunday 3 March 2013

Violet Patissiere Croquembouche with Spun Caramel & Nougatine Base

Happy Birthday little r
My gorgeous little girl has a birthday this week and she's requested that I make a croquembouche with violet creme patissiere.  Hang on a minute, where did this come from?  Ok, I make macarons and blog about them and yeah I think they're pretty good but of course I'm biased.  What happened to kids asking for a cake from the Women's Weekly Birthday Cake cook book?  Surely, that would be a lot easier and definitely a lot less stressful.  I could pour myself a glass of merlot and cruise along and get creative with the icing sugar... mmmm, that sounds good.  But, no - high expectations have been set in our household and in my daughter's eyes I can do anything.  She thinks I'm a wizz in the kitchen and her eyes glisten when she starts talking about all the spun sugar I'm going to make.  So a fancy French croquembouche for my daughter's 10th birthday it is.

I'm currently in planning mode and hope to post some amazing photo's and the recipe next weekend but hope I've not bitten off more than I can choux!  This will be my first ever attempt and guaranteed this will be the longest post ever... oh, the nerves.

Update:  It's Saturday morning and I've decided to make a Violet & Vanilla Creme Patissiere with a lovely pink Pate Sable a Choux first.

OMG... It feels like I've been in the kitchen all day and I'm absolutely pooped.  I've got everything ready but have decided to assemble the croquembouche tomorrow morning. 

Update: It's Sunday morning and today is the day that will make or break my croquembouche.  I've already got one caramel war wound and am not looking forward to any more knowing only too well that I'm likely to experience a lot more pain and probably blisters too:(  Pleeeease, please spun sugar fairy protect my itty bitty fingers whilst I make this delicate sculpture for the apple of my eye.
Considering, I've never made a croquembouche before I do have to say that I'm pretty chuffed with the outcome.  I can't deny that after promising my gorgeous girl the most fantastic birthday cake ever that after all the effort it actually might end up being an epic fail of gigantic proportions with tears and tantrums that I'll probably remember forever. 
Ingredients for the Violet & Vanilla Creme Patissiere 
Sugar, cornflour and eggs.
Boiling the milk, vanilla bean & violet essence


Whisking the creme patissiere until it's light, silky and smooth.
Just Perfect!
Ingredients for the Pate Sable a Choux

I've put the Pate Sable a Choux into the fridge to harden and will use it later when I've piped the choux puffs - here it's in between two layers of parchment paper as it makes it easier to roll out.  I'm going to use a cupcake cookie cutter to cut out shapes to cover the freshly piped choux.
Some of the ingredients for the Nougatine Base
Ouch- one small burn that's turned into a blister - the caramel in this Nougatine Base is dangerously hot! Not entirely happy with the nougatine as it's a tad too dark so I'll try making another base to compare the difference before final assembly. 
Ingredients for the Choux Puffs
Boiling the water, butter, salt and sugar.

The roux needs to reach 80 degrees celsius for the proteins to coagulate.
Allow the roux to cool to about 40 degrees celsius before blending in the eggs. - one at a time.
The cupcakes magically disappeared in the oven!
Cupcake Pate Sable a Choux
This glass storage jar holds the croquembouche mould (oops, I mean witch's hat) perfectly.
Ta Da - magic strands of spun sugar.
When the kids saw this their eyes nearly popped out and jaws hit the floor - lol.

This birthday cake was definitely a labour of love as there were several elements that I had to make; and then with a wave of my magic wand transform it into a show stopper. 

Warning: recipes can be a bit boring so here I've added a twist!

From the point where I've taken a photo of the croquembouche mould to the finished product does not show the chaos that I created in my kitchen.  I think it goes something like this... I was wearing my ruby red slippers when this enormous sugar tornado hit my kitchen. The wicked witch of the West fell under my oven and her hat and magic wand lay on my kitchen floor.  The witch was nearly dead but still twitching.  I grabbed her wand and the witches hat.  I turned her hat upside down then used the wand to spin choux puffs from the caramel in the saucepan into the hat.  The nasty witch tried to get me back at this point and she flung caramel from the saucepan onto my ring finger.  The caramel burnt me badly so I gave her the bird (gorgeous little r, please don't read this bit).  I started doing a bit of bitchen in the kitchen and the witch must of heard, next I looked she was dead.  Steadfast, I worked on and on all the while in agonizing pain.  The good sugar spun fairy must of heard my pleas for help and she popped in for a second to help me weave a gorgeous web of spun sugar then disappeared.  The sugar spinning bit went a tad too far however, as my kitchen was covered in it.  It flicked on the floor, the walls my choux and my running shoe (ummm, I mean slippers).  Maybe instead of looking like a lovely lady with ruby red slippers, I now looked like I'd turned into a golden orb web spider!  Not only could I catch birds with this stuff but I could probably catch a few stray kids... mmmmm, this story now sounds like it's drifting off into Hansel & Gretel territory - probably time to stop.
I love shoes, choux, the feet on macarons and ruby red slippers!

Friday 1 March 2013

A Gorgeous Guinness Stew with Yorkshire Pudding

My first ever taste of Guinness was in O'Neills pub in Dublin nearly 10 years ago and I've been hooked ever since.  This is my version of Guinness Stew with Yorkshire Pudding.

Guinness Stew

3 large organic carrots (peeled and cut into thirds)
12 french eschalots (peeled but left whole)
2 bouquet garni
4 tablespoons of triple concentrated tomato paste
2 tablespoons garlic (crushed)
2 x 440ml cans Guinness Draft brewed in Dublin
3 sprigs sage
4 sprigs thyme
Sprinkle of Tuscan seasoning
2 1/2 kg chuck steak
Garlic infused olive oil
1/2 - 3/4 cup cornflour (for dusting)

Preheat oven to 135 degrees celsius (fan forced).

Place the eschalots and carrots into a large 5 3/4 quart Le Creuset casserole dish.
Cut the steak into large cubes (about 5 x 5 cm) and trim off the fat reserving it for the Yorkshire pudding (see the recipe below for the Rendered Beef Fat).
Pat the steak with kitchen towel to remove any moisture then lightly dust in the cornflour.
Heat about a tablespoon of the garlic infused olive oil in a non-stick pan and brown the steak on both sides.  Remove when done and place in the casserole dish on top of the eschalots and carrots.  Cook the steak in batches and periodically deglaze the pan with the Guinness - pour the yummy flavoursome bits into the casserole dish.  Continue until all the steak is done.
Pour remaining Guinness into the casserole and add the garlic, tomato paste, bouquet garni, sage, thyme and then sprinkle a little bit of the Tuscan seasoning on top. 
Place lid on top and cook for 3-4 hours.
Rendered Beef Fat
In a non-stick pan throw all those pieces of fat that you trimmed off the steak and cover with water.  Cook on high heat to render the fat - let the water evaporate.
Strain the fat into a bowl and discard the leftovers.  Allow to cool and set.
Yorkshire Pudding 
4 eggs (broken into a large jug)
The weight of those 4 eggs in milk
The weight of those 4 eggs in plain flour
1 tablespoon cold water
Rendered Beef Fat (above)

Whisk the eggs in the jug then add the milk.

Sift a tablespoon of flour at a time into the egg/milk mixture whisking each time to remove lumps.  Continue until all the flour is used up.
Cover the jug with plastic film and leave the batter on the kitchen bench for 2-3 hours.
Preheat the oven to 240 degrees celsius (fan forced).
Heat an empty 10-12 cup muffin tray in the oven until hot.  
Remove from oven and put a pea size dollop of the rendered fat into the base of each muffin tin.
Place the muffin tray back into the oven, remove when the fat starts to sizzle.
Add the cold water to the Yorkshire pudding batter and whisk one last time.
Fill each muffin tin a third full.
Bake for 10-15 minutes until brown.
If you're lucky any left over puds can be frozen for next time.

Serve the Yorkshire Pudding with the Guinness Stew and a bit of mashed potato (optional) sprinkled with a bit of finely chopped Spanish onion.  This stew is sooooo delicious that you'll want more and more and more and believe me with this recipe there is plenty to go round.  Great with a glass of authentic Guinness Draft brewed in Dublin or a bottle of an Australian red such as 'miles from nowhere" Margaret River 2010 Cabernet Merlot - enjoy.