Showing posts with label macaron equipment. Show all posts

Friday, 11 February 2011

Mauviel M'Passion 30cm Copper Bowl - Made in France

After a bad romance with my KitchenAid Artisan copper bowl, I am pleased to announce that I received my Mauviel M'Passion 30cm Unlined Copper Bowl today and am thrilled to bits!


As you would expect with French heritage, tradition and workmanship M'Passion solid copper bowls are a work of art with exquisite design and quality.  Somehow, I think this good romance is going to last for a very long time...


I also think that the passion in my Mauviel copper bowl will transfer to my macaron and delight the hearts of all who taste them. I'm still yet to find a quality unlined copper bowl to fit my KitchenAid Artisan mixer but until then and just in time for valentines day, my M'Passion bowl will create awesome fireworks between my egg whites and copper particles - just have to get used to using the hand mixer again!


Thank you Mauviel for coming to the rescue.

Friday, 4 February 2011

Bad Romance

It is most unfortunate that I had a "bad romance" with my Kitchen Aid Artisan copper bowl. What I thought was solid copper ended up turning out to be copper plated and when you make the amount of macarons that I do it just didn't last the distance - rather sad really after only 7 months.  The copper wore off and the stainless steel started to shine through and I saw its true colours.  Today, I feel really sad.

Wednesday, 12 January 2011

Macaron Equipment

Although, you don't need expensive equipment to make macaron it certainly does make your job a lot easier.  Also, if well looked after your investment should last several years and quite even possibly save you money.  Here is what you need:
Stand Mixer
Food processor (to grind almonds/almond meal)
Baking trays with a Macaron Template & parchment paper
Precise digital scales
Digital thermometer
Piping bags with size 11 nozzles
A large jug to hold your piping bag
A large stainless steel bowl & sieve
Small stainless steel bowls
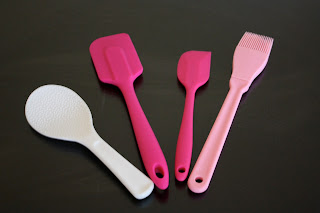
White rice paddle (for straining the TPT into the sieve/bowl), spatulas (for mixing) & a silicone brush (for the sugar syrup)
Mixing bowl for your Kitchenaid (if you have one) &  whisk attachment (for your Italian Meringue)
A small saucepan for your sugar syrup
Cooling racks are a great place to rest those pretty feet!
stylelist
And, we all know that some blokes are pretty proud of their equipment but now we can be proud of ours... ahem, even if it is cooking equipment.

THE DAY BEFORE MAKE THE GANACHE: 1:1 ratio of 53% couverture chocolate and cream. If you want to be creative you can also add some fruit puree, tea or essence. Store it in the fridge then bring back to room temperature before you begin piping.

BASIC MACARONS
INGREDIENTS FOR THE TANT POUR TANT (TPT)
300g sifted TPT (150g almond meal with 150g icing sugar)
55g egg whites
 (fresh)

INGREDIENTS FOR THE ITALIAN MERINGUE (IM)
150g caster sugar

37g water
55g egg whites (old egg whites aged 12-24 hours in a bowl on the kitchen bench)
Wilton gel paste or powdered food colouring


STEP 1. MAKE THE TPT

Mix the Tant Pour Tant (equal quantities of icing sugar and almond meal) with the fresh egg white until it forms a thick paste, cover with cling wrap and set aside.


STEP 2. MAKE THE IM
Pour your aged egg whites into a Kitchen Aid mixer and insert the whisk attachment.
Bring the caster sugar, water and food colouring to the boil in a small saucepan.  When the sugar syrup reaches 115°C start whisking your aged egg whites into soft peaks.  As soon as the syrup reaches 118°C slowly pour the syrup into the beaten egg whites in a thin stream. Continue whisking the IM in the Kitchen Aid until it reaches a temperature between 50-55°C. 

STEP 3. COMBINE THE TPT & IM
With a spatula, fold one-third of the IM into the TPT and egg white paste and knock out some of the air in the batter. At this stage of the process you can be quite rough when handling.
Gently fold in the rest of the IM into the TPT and combine until you have the right texture (should be glossy and look like cake mixture).  Be careful not to over-mix the batter here or it will get too runny and your shells may crack in the oven.

STEP 4. PIPE YOUR MACARON SHELLS
Fill a piping bag with the macaron batter and place some parchment paper over a baking sheet.  Put four small dabs of macaron mix underneath the parchment paper in each corner to secure the paper.  Pipe 3.5 - 4cm diameter circles onto the parchment paper, tap the tray on the work surface to remove air bubbles and leave to dry for about 15-20 minutes to form a crust and are dry to touch.

STEP 5. COOK YOUR MACARON SHELLS
Cook the macaron for 17 mins at 150°C (fan forced oven).  To release steam, leave the oven door open slightly.  If this doesn't work for you, keep experimenting until you find the right temperature as every oven is different.  Once cooked, remove from the baking sheet and leave to cool on the parchment paper over a wire rack.

STEP 6. ASSEMBLE YOUR MACARON
Remove the shells from the parchment paper and pair like sizes together. Pipe a decent blob of ganache onto the shell, then place the lid on top and twist slightly so that the ganache flows out towards the edge of the macaron. When piping the ganache onto the shell always leave a small rim.

STEP 7. STORE YOUR MACARON
Store your macaron in the fridge for 24 hours prior to eating so that the humidity helps the ganache to soak into the shell and allow the flavours to develop.  Try not to eat your macaron the day they are made as they are too dry.  Allow the macaron to return to room temperature prior to serving.

When starting out follow the recipe above but then after you master it double the quantities to make a larger batch. 

To order equipment online check out: